Showing posts with label WSO2. Show all posts

Sunday, March 2, 2014

ESB Performance Round 7.5

WSO2 has carried out a performance testing of latest ESB release, WSO2 ESB 4.8.1. In WSO2 ESB Performance Round 7.5 it compares WSO2 ESB 4.8.1 with other competitive ESB products, Mule ESB 3.4.0, Talend-SE 5.3.1 and UltraESB 2.0.0.

Basic observations are as follows.


Tuesday, July 16, 2013

How to Build WSO2 Code

Although WSO2 is open source many people were having problem with checking out the WSO2 source code and building WSO2 products. Here are the simple steps to do it.
Note that at the moment ongoing development happens inside the trunk with version 4.2.0 SNAPSHOT. Last released WSO2 code is located in branch version 4.1.0 with Carbon platform version 4.1.2.

Build the trunk


  1. Checkout Orbit from https://svn.wso2.org/repos/wso2/carbon/orbit/trunk/
  2. Checkout Kernel from https://svn.wso2.org/repos/wso2/carbon/kernel/trunk/
  3. Checkout Platform from https://svn.wso2.org/repos/wso2/carbon/platform/trunk/
  4. Install Apache Maven 3 in your computer.
  5. Go to the checked out directories and build with Maven of orbit, kernel and platform code respectively. (Use command, mvn clean install)
  6. If any errors comes with tests use the command mvn clean install -Dmaven.test.skip=true
  7. If the build is properly building and you are fortunate you will get all the products as zip files in each product. For example WSO2 BAM will be there in platform/trunk/products/bam/modules/distribution/target directory.
  8. But most probably you will not be able to build all the products well at the same time and it will take much time as well. So you can build the product only you want as follows. Comment the products module in platform/trunk/pom.xml . Then after building all three orbit, kernel and platform, you can manually build the product/s you want. For example if you only want to build WSO2 BAM, go to platform/trunk/products/bam and build with command mvn clean install -Dmaven.test.skip=true

Build the Branch 4.1.0

  1. Checkout orbit from https://svn.wso2.org/repos/wso2/carbon/orbit/branches/4.1.0/
  2. Checkout kernel from https://svn.wso2.org/repos/wso2/carbon/kernel/branches/4.1.0/
  3. Checkout platform from https://svn.wso2.org/repos/wso2/carbon/platform/branches/4.1.0/
  4. Follow the exact steps 4, 5 and 6 mentioned under the topic, "Build the trunk".
  5. In 7th step, use the directory path, branches/4.1.0/products/bam/2.3.0/modules/distribution/target as the BAM pack location.
  6. Then follow the 8th step by commenting the product module in branches/4.1.0/pom.xml and building the BAM in location, branches/4.1.0/products/bam/2.3.0

Build a Tag

When already there is a released product, best way to build it, is by checking out the tag of the released version. The reason is that even the branch may be committed after the release by a mistake.
For this example lets continue with WSO2 BAM 2.3.0. It has orbit version 4.1.0, kernel version 4.1.0 and platform version 4.1.2. You can checkout these three from https://svn.wso2.org/repos/wso2/carbon/orbit/tags/4.1.0/ , https://svn.wso2.org/repos/wso2/carbon/kernel/tags/4.1.0/ and https://svn.wso2.org/repos/wso2/carbon/platform/tags/4.1.2/ . Then continue building in the same way as earlier.


Monday, January 7, 2013

Writing a Custom Mediator for WSO2 ESB - Part 3

This is the last part of blog post series about creating a WSO2 ESB mediator. Older parts are,
  1. Part 1
  2. Part 2
In this post I will explain the UI component of a ESB mediator using the BAM mediator (Carbon version 4.0.5). UI component (i.e.: org.wso2.carbon.mediator.bam.ui) is responsible for the BAM mediator specific UIs in the following UI.

Mediator UI


When BAM mediator is selected in the above mediator sequence (there is only the BAM mediator is available here anyway) the UI located under the sequence UI, is specified in the mediator UI component. Anyway not all the UI under it comes from the UI component. UI between the bar named Mediator and Update button comes from the UI component. Actually this is the edit-mediator.jsp JSP located in the resources package in org.wso2.carbon.mediator.bam.ui component.
After the changes are made on UI the user can click on the above mentioned Update button. This event will call the update-mediator.jsp JSP adjacent to the edit-mediator.jsp JSP.

When switch to source view is clicked the following source appears.


And you can return back to design view by clicking on switch to design view link. This toggling mechanism need the implementation of UI component. In simple terms this functionality need the implementation of,
  1. BamMediator UI class - similar to BamMediator class in backend component
  2. serialize method - similar to serializeSpecificMediator method in BamMediatorSerializer class in backend component
  3. build method - similar to createSpecificMediator method in BamMediatorFactory class in backend component

Abstract Mediator Class (UI)


The difference of UI component with backend component is, that both serialize method and build method are included in the BamMediator UI class. BamMediator UI class can be found in org.wso2.carbon.mediator.bam.ui package.
BamMediator class should inherit from org.wso2.carbon.mediator.service.ui.AbstractMediator.
And also it should implement getTagLocalName method, similar to getTagQName used in backend. And also the serialize and build methods as mentioned earlier should be implemented.

public class BamMediator extends AbstractMediator {

    public String getTagLocalName() {

    }

    public OMElement serialize(OMElement parent) {

    }

    public void build(OMElement omElement) {

    }

}

Abstract Mediator Service Class


Every mediator UI component should consists of a Mediator Service class. In this example BamMediatorService is the class which implements the required settings of the UI. Let's explain with the example.

public class BamMediatorService extends AbstractMediatorService {

    public String getTagLocalName() {
        return "bam";
    }

    public String getDisplayName() {
        return "BAM";
    }

    public String getLogicalName() {
        return "BamMediator";
    }

    public String getGroupName() {
        return "Agent";
    }

    public Mediator getMediator() {
        return new BamMediator();
    }

}

As the example says every Mediator Service should inherit the org.wso2.carbon.mediator.service.AbstractMediatorService class.
Note how the name BAM is used as the sequence editor under the sub menu item named Agent. See how the getMediator method is used to execute the BamMediator UI class which we have discussed earlier.

Bundle Activator Class


Unlike other Carbon bundles where Bundle Activator is defined in the backend bundle, in a mediator class, the Bundle Activator is defined in the  UI bundle. In this example it is BamMediatorActivator class.

Basically the Bundle Activator should inherit the org.osgi.framework.BundleActivator class and should implement start and stop methods. For further information read this article.

Properties props = new Properties();

bundleContext.registerService(MediatorService.class.getName(), new BamMediatorService(), props);

Note how the BamMediatorService class is used.

Congratulations, you have finished the post series of how to write a custom mediator with WSO2 ESB. If you could not understand this well, most probably that is because you are not familiar with WSO2 Carbon platform. If you search more you will be able to catch them.

Friday, January 4, 2013

Writing a Custom Mediator for WSO2 ESB - Part 2

Let's continue from the previous post, Part 1. As there were several changes and fixes happened to BAM mediator, there we are taking the example of two latest components,
  1. org.wso2.carbon.mediator.bam version 4.0.5 - backend component
  2. org.wso2.carbon.mediator.bam.ui version 4.0.5 - UI component
As you can see, there is no services.xml file exists in the backend component. There are two files namely org.apache.synapse.config.xml.MediatorFactory and org.apache.synapse.config.xml.MediatorSerializer containing the class names (with package name) of Mediator Factory and Mediator Serializer. Let's discuss the usage of these 2 classes.

Mediator Factory


In WSO2 ESB, each mediator is created using the Factory design pattern. When the ESB starts each mediator is created using a Mediator Factory. The programmer is given the opportunity to write the Mediator Factory as a single class. In this example, the factory class is org.wso2.carbon.mediator.bam.xml.BamMediatorFactory that contains all the instantiating code relevant to the mediator. Factory class is the code that generates the mediator based on the mediator XML (XML specification of the mediator in the ESB sequence). In this factory the configuration information should be extracted from the XML and should create a mediator based on that configuration.

public Mediator createSpecificMediator(OMElement omElement, Properties properties) {

}

This method should be implemented which takes the XML as an OMElement and returns the Mediator to be produced. Here it is an instance of the BamMediator class we have defined in the parent package.
And also in this method it can access the secondary storage (e.g.: Registry) as the method is not performance critical. (This method will run only at the creation stage of a mediator.)

public QName getTagQName() {

}

This method should also be implemented to return the QName of the XML of the specific mediator. In BAM mediator it has the name "bam".

Mediator Serializer

Mediator Serializer does the reverse of the Mediator Factory. It creates the XML, related to the mediator, back from the Mediator class. (Here it is from BamMediator)

public OMElement serializeSpecificMediator(Mediator mediator) {

}

This method should implement which does the above said conversion. (serialization) It takes the Mediator and returns the generated XML, related to the mediator.

public String getMediatorClassName() {

}

And also this should be implemented to return the Mediator's class name.

Now let's start discuss about the most important class, the Mediator class, here the BamMediator class.

Mediator Class

This is the class used while the ESB is running for the purpose of mediation. As this class is executed in run time it should be designed with care avoiding unnecessary performance degrading actions. And also because this class is executed in parallel threads, should be careful on concurrency issues and make them thread safe.
Mediator class should always extend the AbstractMediator class.

public boolean isContentAware() {
    return true;
}


The above method must be included in the Mediator class if the mediator is intended to interact with the MessageContext.
mediate is the most important method that should be implemented.


public boolean mediate(MessageContext messageContext) {

}

mediate method is given the MessageContext of the message, which is unique to an each request passing through the mediation sequence. The return boolean value should be true if the mediator was successfully executed and false if not.

Note that global variables in the Mediator class may cause race condition as different threads of the mediation sequence may access the same global variable. It can be prevented by one of the following techniques.
  1. Using local variables inside the method
  2. Storing variables in the MessageContext as Properties
  3. Using thread local variables
Best way to handle this issue is possible with first technique if the mediator is not that complex. And the third technique should be used with care if want to use due to the risk of memory leaks.

Let's discuss about the UI package in the next part (Part 3).

Wednesday, November 7, 2012

Writing a Custom Mediator for WSO2 ESB - Part 1

Not another "How to Write a Class Mediator"

This blog post discusses how to write a genuine/real Mediator for WSO2 ESB. This is not another article on writing a Class Mediator based on the content from Oxygen Tank articles,
  1. Writing a Mediator in WSO2 ESB - Part 1 and
  2. Writing a Mediator in WSO2 ESB - Part 2 .
Although the above mentioned content is very popular in web, I could not find any article describing how to write a real ESB mediator for WSO2 ESB. This post describes how to create a real ESB mediator.

Difference between a genuine/real mediator vs a Class mediator

In WSO2 ESB you can find mediators like Log Mediator, Clone Mediator, Cache Mediator, Property Mediator and etc. Class mediator is a similar mediator comes ready with the WSO2 ESB. Class mediator is a special mediator that provides an API to a novel programmer to implement his/her custom code as a mediator in side the WSO2 ESB. Above mentioned articles describes how to create a mediator using a Class mediator. But, a Class mediator may not give you the full power of a WSO2 ESB mediator. It will not be shown in the mediator menu that contains the other mediators and will not be able to easily configurable using the UI as other first class citizen mediators. Class mediators cannot extract parameters from the XML exists in the mediator XML as a first class mediator. There may be some other restrictions as well that I have not gone through.

Why this post is important ?

So if you are really interested on creating your own mediator with all the privileges consumed by other mediators in the ESB, you have to create your own mediator as described in this post. I am going to explain the knowledge I gathered while I was designing and implementing the BAM Mediator. I referred the implementation of Smooks Mediator as a reference to a custom mediator. You too can follow either Smooks Mediator or BAM Mediator as the reference mediator if required. The reason is that the implementation of UI bundles and backend bundles are implemented in different places in other available mediators. In those mediators, although the UI components are implemented as WSO2 components, their backends are located inside the dependencies -> Synapse location.

Code and Background

Start Coding

First you have to checkout the WSO2 Carbon source code from the trunk/branch/tag as required. Then you have to build it with Maven 3. Now you can add your custom mediator as a Carbon Component into the correct location. In my case this is the location for the BAM Mediator. (i.e. : BAM Mediator is located in here and Smooks Mediator located in here.) The advantage of using this location is that you can inherit all the required Mevan dependencies from the parents. From here onward for explanation purpose I will use BAM mediator as the example mediator.

Code Locations

Basically you can create the mediator component in /components/mediators/ and you can include all the UI bundles and backend bundles inside your mediator directory /components/mediators/bam. Then you have to go to the Carbon mediators feature in /features/mediators/ and create the mediator feature as /features/mediators/bam-mediator/ in a suitable feature name. Then you can build the p2-repo feature of your feature by adding your feature into the pom.xml in /features/repository/ and building the p2-repo.

Pre-requisite Knowledge

Before you go through this blog you need to have a knowledge on how to work with WSO2 Carbon framework. Basically you need to know how to create a Carbon Component, create a Carbon feature and install a feature to a WSO2 Carbon server. This webinar will be a useful one for learning.
And also being familiar with Apache Mevan 3 and OSGI is required. No need to say about Java :) . It is a must.

Writing the Mediator

Bundles Used

Let's start to create the mediator. First you need to know the usage of UI bundles and backend bundles in a mediator. Mainly there should be at least a one main UI bundle and a one main backend bundle to build a mediator component.

  • Main UI bundle - Adds the UI functionality to be used in the Design Sequence view as shown below. In BAM mediator org.wso2.carbon.mediator.bam.ui is the main UI bundle.

Shows the mediator in the mediator menu

Mediator configuration is allowed via UI under the mediator menu

  • Main backend bundle - Is responsible for all the mediation related backend processing. In BAM mediator the main backend bundle is org.wso2.carbon.mediator.bam .
There can be more UI bundles (e.g. : org.wso2.carbon.mediator.bam.config.ui) and backend bundles (e.g. : org.wso2.carbon.mediator.bam.config) created for helping the main bundles.

Structure of Main Bundles

As WSO2 ESB is allowing the programmer to add their custom mediator as pluggable components to the ESB, most of the UI functionality and mediator functionality required to interact with the rest of the ESB is made transparent to the programmer. In other words the programmer have to program only what he/she really wants from the mediator but not how to plug the component into the ESB. This is one of a sign of the good architecture of WSO2 ESB. It is intelligent enough to identify the Java class by its name and location in the component and refer them appropriately in the ESB. The programmer only need to implement the classes and the rest will be done by the ESB internally. Due to that reason, the user does not have to (and should not) implement a Service Stub to access the main backend bundle from the main UI bundle.
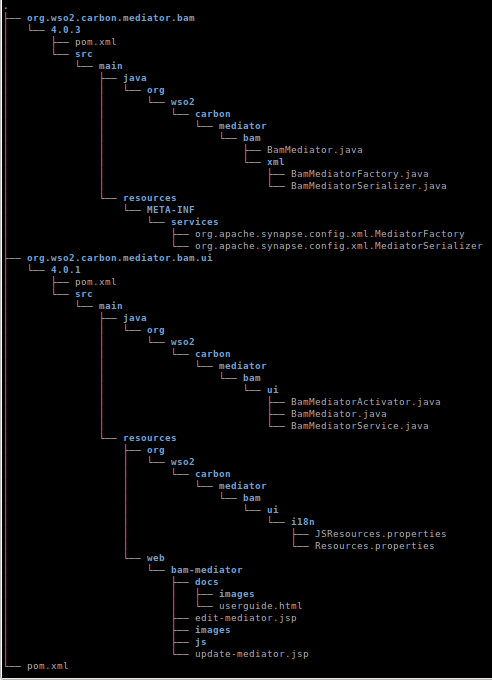
Below it is given the structure of the mediator component (BAM mediator is used as the example) in version, 4.0.3. (Only the relevant directories and files are mentioned) Note that the version of UI component used here is 4.0.1.


For purpose of selecting text, the above structure is given as text below.


.
├── org.wso2.carbon.mediator.bam
│   └── 4.0.3
│       ├── pom.xml
│       └── src
│           └── main
│               ├── java
│               │   └── org
│               │       └── wso2
│               │           └── carbon
│               │               └── mediator
│               │                   └── bam
│               │                       ├── BamMediator.java
│               │                       └── xml
│               │                           ├── BamMediatorFactory.java
│               │                           └── BamMediatorSerializer.java
│               └── resources
│                   └── META-INF
│                       └── services
│                           ├── org.apache.synapse.config.xml.MediatorFactory
│                           └── org.apache.synapse.config.xml.MediatorSerializer
├── org.wso2.carbon.mediator.bam.ui
│   └── 4.0.1
│       ├── pom.xml
│       └── src
│           └── main
│               ├── java
│               │   └── org
│               │       └── wso2
│               │           └── carbon
│               │               └── mediator
│               │                   └── bam
│               │                       └── ui
│               │                           ├── BamMediatorActivator.java
│               │                           ├── BamMediator.java
│               │                           └── BamMediatorService.java
│               └── resources
│                   ├── org
│                   │   └── wso2
│                   │       └── carbon
│                   │           └── mediator
│                   │               └── bam
│                   │                   └── ui
│                   │                       └── i18n
│                   │                           ├── JSResources.properties
│                   │                           └── Resources.properties
│                   └── web
│                       └── bam-mediator
│                           ├── docs
│                           │   ├── images
│                           │   └── userguide.html
│                           ├── edit-mediator.jsp
│                           ├── images
│                           ├── js
│                           └── update-mediator.jsp
└── pom.xml

As the post is going to continue further more let's discuss further on this topic in Part 2.

Wednesday, October 24, 2012

BAM Toolboxes

Why BAM Toolboxes ?

As mentioned in introduction to BAM WSO2 BAM consists of three main components named Data Receiver, Analyzer and Visualizer. These three components act independent as much as possible to,

  1. Reduce the complexity of the BAM,
  2. Enable to scale up the BAM independently in each component,
  3. And enable to plugin each component when enhancing the architecture.

In the end user's point of view, these three components are complex set of API's. Many of their functionality are suitable to make transparent to the end user. Manually configuring each of them according to the business requirement is quite difficult and takes a long learning curve. But due to the requirement of flexibility and extendability this complexity is unavoidable. The solution is BAM Toolboxes.
Developers of BAM are shipping a set of pre-configured examples as a single zip archive file with the extension, "tbox" which can be deployed in BAM easily. Although the rationale behind the concept "toolbox" is much broader, in current versions of BAM we are shipping only a set of examples, for some useful and popular use cases of BAM. The user can study the given toolboxes in a relative use case and adopt them according to their requirements. In future we expect to deliver a much generic type of toolboxes to achieve the requirements of the BAM toolboxes.

Toolbox Content

At the moment, a toolbox is basically a zip archive of,

  1. Stream Definitions
  2. Analytics
  3. And Visualization Components.
The user should specify each of the above contents accordingly compatible with each other. Let's understand what each of them are and how they are related to each main three components of BAM. This post only discusses about the theoretical aspects of BAM toolboxes. Implementation details can be found here.

Stream Definitions

A detailed description about the Stream Definition concept is given in an earlier post. A toolbox should include the set of stream definitions used in the toolbox. Actually including Stream Definitions in a toolbox is optional as even without Stream Definitions, the toolbox functions well. The Stream Definition was introduced to toolboxes, to avoid an exception printed in the console, when the Hive script is executed before the data is stored in the Cassandra. (i.e. Column family is created when the very first time the data is sent to the Cassandra database. When Hive query is trying to access an unavailable column family, the exception fires.) The syntax is similar to the syntax given in the post about Stream Definitions. Here is an example stream definition which is the real stream definition used in Activity Monitoring toolbox 2.0.1.

{
  'name': 'org.wso2.bam.activity.monitoring',
  'version': '1.0.0',
  'nickName': 'Activity_Monitoring',
  'description': 'A sample for Activity Monitoring',
  'metaData':[
          {'name':'character_set_encoding','type':'STRING'},
          {'name':'host','type':'STRING'},
          {'name':'http_method','type':'STRING'},
          {'name':'message_type','type':'STRING'},
          {'name':'remote_address','type':'STRING'},
          {'name':'remote_host','type':'STRING'},
          {'name':'service_prefix','type':'STRING'},
          {'name':'tenant_id','type':'INT'},
          {'name':'transport_in_url','type':'STRING'}
  ],
  'correlationData':[
          {'name':'bam_activity_id','type':'STRING'}
  ],
  'payloadData':[
          {'name':'SOAPBody','type':'STRING'},
          {'name':'SOAPHeader','type':'STRING'},
          {'name':'message_direction','type':'STRING'},
          {'name':'message_id','type':'STRING'},
          {'name':'operation_name','type':'STRING'},
          {'name':'service_name','type':'STRING'},
          {'name':'timestamp','type':'LONG'}
  ]
}

Analytics

The middle component of the BAM is the analyzer. The analyzer is basically a Hadoop analytics engine. As Hadoop codes are considered as a very primitive programming, Hive scripts are run on top of Hadoop. Therefore the programming part of analyzer is a set of Hive scripts. These Hive scripts can be scheduled so that the scripts are executed periodically in as given or they can be unscheduled and can be executed manually when required.
Roughly what should happen in a Hive script can be described as follows.
  1. Create Hive tables for Cassandra column families that contain data received from the Data Receiver. - This will create the metadata of Hive tables relevant to the real Cassandra column families.
  2. Create Hive tables for RDBMS tables. - This will create the metadata of Hive tables relevant to the real RDBMS tables that should contain processed result data.
  3. Create Hive tables for both Cassandra and RDBMS tables that should keep intermediately generated data. (This is optional)
  4. Process data from source Hive tables and overwrite result data in the result Hive tables. If required intermediate can be stored in intermediate Hive tables.
Hive language is similar to SQL and can be learnt from HIve tutorial. Usage of JDBC handlers in Hive script can be found from here. Here is an example Hive script written for the Activity Monitoring toolbox 2.0.1.

CREATE EXTERNAL TABLE IF NOT EXISTS ActivityDataTable
 (messageID STRING, sentTimestamp BIGINT, activityID STRING, version STRING, soapHeader STRING, soapBody STRING)
 STORED BY 'org.apache.hadoop.hive.cassandra.CassandraStorageHandler'
 WITH SERDEPROPERTIES (
  "cassandra.host" = "127.0.0.1" ,
 "cassandra.port" = "9160" ,
 "cassandra.ks.name" = "EVENT_KS" ,
 "cassandra.ks.username" = "admin" ,
 "cassandra.ks.password" = "admin" ,
 "cassandra.cf.name" = "org_wso2_bam_activity_monitoring" ,
 "cassandra.columns.mapping" =
 ":key, payload_timestamp, correlation_bam_activity_id, Version, payload_SOAPHeader, payload_SOAPBody" );

CREATE EXTERNAL TABLE IF NOT EXISTS ActivitySummaryTable(
 messageRowID STRING, sentTimestamp BIGINT, bamActivityID STRING, soapHeader STRING, soapBody STRING)
 STORED BY 'org.wso2.carbon.hadoop.hive.jdbc.storage.JDBCStorageHandler'
 TBLPROPERTIES (
 'mapred.jdbc.driver.class' = 'org.h2.Driver' ,
 'mapred.jdbc.url' = 'jdbc:h2:repository/database/samples/BAM_STATS_DB;AUTO_SERVER=TRUE' ,
 'mapred.jdbc.username' = 'wso2carbon' ,
 'mapred.jdbc.password' = 'wso2carbon' ,
 'hive.jdbc.update.on.duplicate' = 'true' ,
 'hive.jdbc.primary.key.fields' = 'messageRowID' ,
 'hive.jdbc.table.create.query' =
 'CREATE TABLE ActivitySummary (messageRowID VARCHAR(100) NOT NULL PRIMARY KEY,
  sentTimestamp BIGINT, bamActivityID VARCHAR(40), soapHeader TEXT, soapBody TEXT)' );

insert overwrite table ActivitySummaryTable
 select messageID, sentTimestamp, activityID, soapHeader, soapBody
 from ActivityDataTable
 where version= "1.0.0";

Visualization Components

Visualizing the processed data from the Analyzer is the duty of the Visualizer. Generic way of visualizing different types of data, with different types of user-UI interactions is the main requirement of the BAM Visualizer. As the other two main components of BAM, Visualizer too have to be configured by the user according to the requirement. So the complexity of configuration of Visualization should be easy while fulfilling the above main requirement.
At this stage of BAM (version 2.0.1), it is designed to visualize using two different ways that is suitable for two different requirements. (Excluding the report generation mechanism)

  1. Generate a Gadget and deploy it in a Dashboard (this is the same dashboard used in WSO2 Gadget Server) - This way of configuration is most suitable for non-technical (ordinary) users. It is a straightforward way of generating a gadget using the Gadget Wizard by just specifying the type of visualization component (e.g.: Bar Chart) and the relevant data sets to each axis. (e.g.: x-axis, y-axis) But this way of specifying a visualization component is poor in flexibility and user interactive quality in the UI.
  2. The other way of specifying a visualization component is by writing a custom dashboard with Jaggery. Jaggery is a server side JavaScript language which is capable of interacting with web services and Carbon data sources. I recommend to look into an existing custom dashboard if someone is interested on creating their own custom dashboard.
Generating reports is another major visualization feature available in BAM. I am not going to discuss about it in this post.

Overall content of a toolbox archive can be shown as below.


Friday, October 19, 2012

Stream Definitions

In this post I would like to explain more about WSO2 BAM 2.0. This blog post will be mainly focused about the concept of Data Streams used in WSO2 BAM and also in WSO2 CEP.

Introduction Data Streams

As mentioned in the previous post, Data Bridge is the generalized form of receiving data from an external data source and the generalized form of storing them to the secondary storage. In earlier versions of BAM it was tried to send data from external data source to the Data Receiver via different types of protocols. The problem was the lack of throughput achieved by them. BAM was expected to be used under the heavy load of data from high trafficked Enterprise Service Buses and web services. The scale of data was categorized as Big data due to its size and unstructured nature and need to be handled with a data transfer protocol scalable in throughput.
Earlier techniques that were used were mainly based on data protocols with key-value pair couples. And the data overhead of its container was a main concern. So the designers came up with the idea that if the types of data to be transferred is required to be known only at the beginning of the transmission there is no need to specify the types of data every time it is specified. In other words key-value pairs are redundant with information. And also they found if the data to be transmitted very frequently, in very small chunks, can be converted to a sequence of large packets, with aggregated data, transmitted periodically, the overhead can be significantly reduced. This way of thought brought them to the concept of Data Streams.
Data Streams is an implementation based on Apache Thrift which is a binary protocol that fulfills the above given requirements. With the performance tests performed they found that Thrift has the highest throughput within the available technologies suited for the given requirement. Some of implementation details of Data Streams in Data Agents can be found here. This will be discussed in detail in future.

Stream Concept

In this Stream concept the data sender has to agree on a set of data types it wish to send in an each data event. So when the first message is sent to the Data Receiver, the set of types of it wish to send, is sent with the message defining the Stream. This is known as the Stream Definition. Each Stream Definition is unique in the pair of Stream Name and the Stream Version. Stream Name corresponds to the Cassandra Column Family the stream of data to be stored. So when different stream definitions are required to be used to store several data streams into the same column family, different stream versions should be used with the same stream name corresponding to the column family. After the stream definition is sent once in each stream, the types of data transferring will not be mentioned in later messages sent to Data Receiver. Only the data values will be sent hereafter as chunks to the Data Receiver where the data is read as the given stream definition. Unlike in protocols like HTTP, where every data type is sent as string, in Thrift for each field the space allocated in each message is only the required number of bits. This is also an advantage related to a high throughput.

Stream Definition Example

Although a Data Stream can be defined using Java in code, there is another way of defining a Stream as a Java string with the format of a JSON object. For the ease of understanding the concept I am going to give a sample code defining a Stream Definition.


{
  'name': 'stream.name',
  'version': '1.0.0',
  'nickName': 'stream nick name',
  'description': 'description of the stream',
  'metaData':[
          {'name':'meta_data_1','type':'STRING'},
          {'name':'meta_data_2','type':'INT'}
  ],
  'correlationData':[
          {'name':'correlation_data_1','type':'STRING'},
          {'name':'correlation_data_2','type':'DOUBLE'}
  ],
  'payloadData':[
          {'name':'payload_data_1','type':'BOOL'},
          {'name':'payload_data_2','type':'LONG'}
  ]
}

The column family created for this stream will be "stream_name" in "EVENT_KS" by replacing dot (".") with an underscore ("_"). The default version should be "1.0.0" and it can be incremented when another stream is required to be added to the same Cassandra column family or if the existing stream is to be edited. The important thing to note here is that a stream cannot be deleted or edited at the moment but when required, another stream should be created with the same name but with a different version.
Here "metadata" corresponds to the meta information related to the stream. e.g.: character set encoding and message type. "correlationData" corresponds to the data required to correlate between different monitoring points such as the "activity ID" of a message flow. All other content related to the payload of the message such as SOAP header of the message, SOAP body of the message and properties intercepted from the message should be specified as "payloadData". Their type should be specified as the "type" in each field. Valid types are as follows.
  1. String
  2. Int
  3. Long
  4. Double
  5. Float
  6. Bool

This post is intended to get only the theoretical background in Stream Definitions used in WSO2 BAM 2.0. I hope to discuss coding in future posts.

Wednesday, October 17, 2012

WSO2 BAM 2.0 - Overview

Introduction to WSO2 BAM

WSO2 BAM is an open source (with Apache license version 2.0) business activity monitor developed on top of WSO2 Carbon framework 4.0. WSO2 introduced BAM for its products initially to monitor the statistics of WSO2 Enterprise Service Bus (ESB). But in BAM 2 the concept was broad and it acts as a server basically capable of capturing data from external source, process them and visualize them according to the requirement.
WSO2 BAM is not completely described by the definition of BAM describes previously. WSO2 provides two different solutions for monitoring data in real-time and periodically. Realtime data analysis is achieved from the WSO2 CEP Server which is capable of processing data in a little latency inside memory which based on Siddhi CEP engine. WSO2 BAM is used for analyzing data batch-wise which is using secondary storage stored data as the source and generate web based visualization user interfaces and reports based on analyzed data.
One of the main advantage of WSO2 BAM 2.0 is its inherent design to deal with scalability and extendability to achieve requirements of big data handling.

Overall Structure of WSO2 BAM

Mainly WSO2 BAM is defined with three major parts.
  1. Data Receiver
  2. Analyzer
  3. Visualizer

Data Receiver

All the data to be analyzed and visualized should be sent to the BAM via Data Receiver. Data receiver immediately store them in a Secondary storage. (Current implementation is a Cassandra big data database)
Data Receiver consists of a generic data collector component called "Data Bridge" which provides an generic data API to the external data sources. Current implementation supports Thrift protocol which is a fast binary protocol that runs on top of TCP and facilitates a very high throughput using some optimization techniques based on a concept called "Data Streams". And also Data Bridge provides a generic API for secondary storage which enables many types of external secondary storage systems to subscribe for data events. Current implementation of secondary storage is Cassandra as mentioned earlier. Therefore the Data Bridge interface of secondary storage is implemented by the "Cassandra Persistence Manager" that stores the data events pushed by the Data Bridge.

Analyzer

In WSO2 BAM, received data into the Cassandra database are used for processing inside the Analyzer. Data are processed as batch processes and processed data are stored into a secondary storage media. That secondary storage can either be an big data storage system or an RDMS storage system. Intermediately processed data are usually stored in a big data database and final results are usually stored in a RDMS database. This known as a Polyglot data architecture.
In current implementation Apache Hadoop engine is used as the processing engine and process queries are written on top of Apache Hive which is a SQL like language. Hive scripts are executed periodically on the given dataset as scheduled earlier.

Visualizer

The next part of the BAM is designed to visualize processed in two ways.
  1. In web based UI visualization elements
  2. Generate report documents
Report generation and UI visualization both are using the processed data produced by the Analyzer. In UI visualization, at present, we use both Jaggery based custom dashboards for identified specific usecases and WSO2 Gadget Server (GS) based gadgets. From the above two, generating GS based gadgets are facilitated with a Gadget Generation component in BAM, that enables even an ordinary user, to generate custom gadgets for their own usecases.

Secondary Storage

There mainly two types of secondary storage used in BAM.
  1. Big data databases
  2. RDMS databases
Cassandra is used as the big data database solution and MySQL is generally used as the RDMS solution. But in the BAM pack H2 embedded database is used as the default RDMS database.
RDMS databases are usually used for storing result datasets which are several orders smaller than the original dataset where original datasets are considered as big data datasets.

Data Agents

Data Agents are custom components designed for each data source. For example "BAM Mediator" and "Service Data Agent" are such data agents specifically designed for WSO2 ESB and WSO2 Application Server. (AS) Current API of Data Agent should implement the Data Bridge API to push data into Data Receiver. In other words Data Agents should communicate with the Data Receiver as Data Streams.

Lets discuss more deeper about WSO2 BAM 2.0 in next post.